If you’re looking for a router that’s well-suited for running OpenWrt, the Google WiFi AC-1304 also known by its internal name “Google Wifi Gale” is one of the best options available. With a robust hardware, it offers a great platform to take advantage of OpenWrt’s advanced features. In this post, I’ll share my experience of flashing and running OpenWrt on this router.
This post will be updated gradually over time.

Why Google WiFi AC-1304?
Although the Google WiFi AC-1304 is considered an older device (released in 2016) and lacks modern features like Wi-Fi 6 found in today’s routers, its robust hardware makes it an ideal choice for OpenWrt enthusiasts who want to unlock the full potential of their routers and enjoy wireless freedom. Here are some key highlights:
- Processor: Qualcomm ARM v7 Quad-Core Processor rev 5 (v7l) 716 MHz and Qualcomm IPQ4019 SOC
- Dual-Band Wi-Fi: Supports both 2.4 GHz and 5 GHz bands, (QCA4019 2.4GHz 802.11bgn + QCA4019 5GHz 802.11ac), ensuring stable and fast connections across your devices.
- 4GB eMMC Internal Storage and 512 MiB RAM: Unlike many routers, the AC-1304 includes 4GB of internal storage, providing ample space for installing OpenWrt packages and custom configurations.
- 2x 10/100/1000 Mbit/s Ethernet Ports
- 1x USB-C / 3.0
- Compact Design: A sleek and minimalistic look that fits any setup.
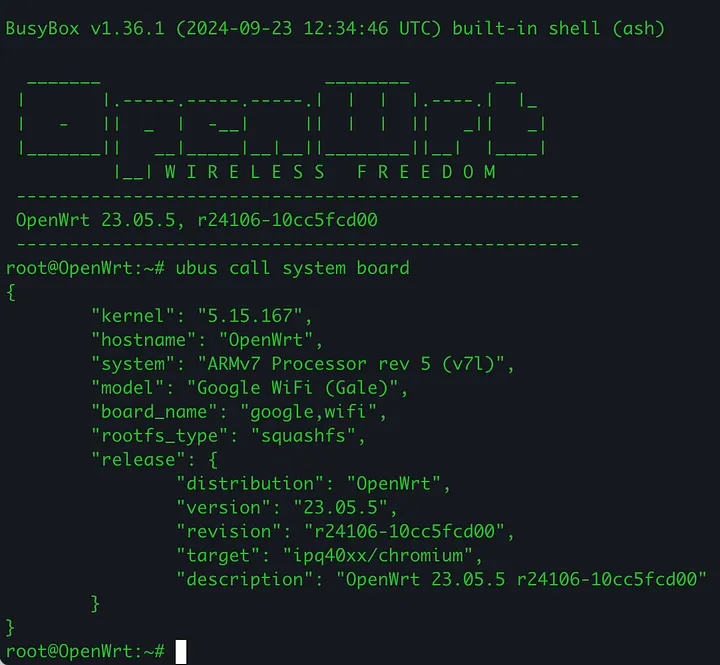
OpenWrt on Google WiFi AC-1304
To unlock advanced features like VPN support and traffic shaping, you can flash the Google WiFi AC-1304 router with OpenWrt. This process is particularly beneficial for power users who want more control and customization over their network.
I followed the OpenWrt wiki guide for flashing the Google WiFi AC-1304 and also found a YouTube video that offers step-by-step instructions, making the process easy to follow, even for beginners.
Flashing Google WiFi AC-1304
1. Tools Required:
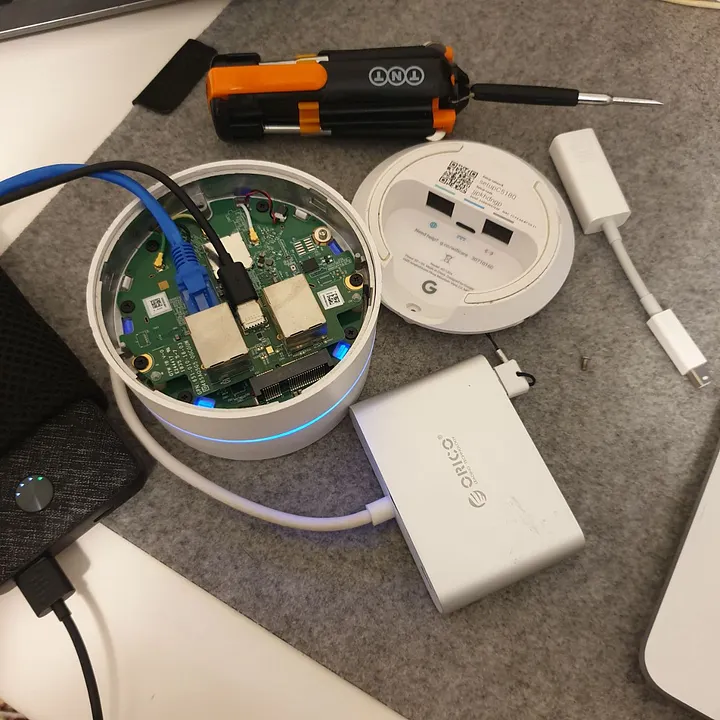
here is the tools required for flashing Google WiFi AC-1304 with OpenWrt:
- A Compatible USB-C Power Adapter (5V 3A): A proper USB-C power adapter (5V 3A) is essential for stable operation. Without it, you may experience issues such as frequent reboots due to insufficient power.
- A USB Hub with Power Delivery: You’ll need a USB hub with both USB-C and standard USB ports to support both USB storage and USB-C power supply. I used an ORICO USB hub device for this purpose.
- A USB-C Cable: Necessary for connecting your power adapter to the USB hub or router.
- A 4GB USB Flash Drive or Larger: Note that Recovery mode may not work with all USB drives (e.g., some newer USB 3.0 drives). If the device doesn’t accept your USB drive, try using a different one.
- An Ethernet Cable and Converter: You’ll need a converter to connect the Ethernet cable to a USB or Thunderbolt port in order to link it to your computer.
- A PH0 Screwdriver: Required to open the router case.
- Chrome Browser: To install the “OnHub Recovery Utility” extension (note that this utility doesn’t support GNU/Linux, but works fine on macOS/Windows).
- SSH Client: A terminal program like Terminal (macOS), PuTTY (Windows), or any other SSH client to access the device and copy necessary files.
2. Required Softwares:
- Download OEM Firmware and Factory image: First, download the OEM firmware and factory image from the relevant OpenWRT wiki page for google WiFi.
Note: Before flashing OpenWrt, you must restore the Google WiFi to its factory default software. This is important because the stock firmware is based on ChromeOS, which includes a bootloader based on Coreboot and Depthcharge. You’ll need to enable Developer Mode to run non-Google-signed software like OpenWrt.
- Install the OnHub Recovery Utility: Open Chrome and install the OnHub Recovery Utility extension here
- Launch the OnHub Recovery Utility: Once installed, open the extension and select “Use Local Image” from the top-right menu.
- Select the Factory Image: Choose the factory image you downloaded earlier (named something like chromeos_**).
- Create the Recovery Image: Insert your USB flash drive and select it from the menu to create the recovery image.
3. Factory Reset
Once you have the Recovery USB image, follow these steps to begin the recovery procedure:
- Connect the Power Adapter: Plug the power adapter into the USB hub using the USB-C port.
- Press and Hold the Reset Button: While holding the Reset button (located on the front of the device), connect the USB hub’s power cable to the Google WiFi device.
- Wait for the LED to Blink Orange: After about 16 seconds, the LED should blink orange. At this point, release the Reset button.
- Insert the USB Flash Drive: Plug the USB flash drive containing the recovery image into the USB hub.
- Recovery Begins: The LED will turn off, and the recovery process will start.
- Wait for the Device to Reboot: After approximately 5–6 minutes, the device will automatically reboot, and the LED will pulse blue, indicating that recovery is complete.
- Check for the WiFi SSID: A WiFi network named “Setup****” should appear in the nearby WiFi scanning results.
Important: Do not remove the flash drive until you confirm that the “Setup****” WiFi network appears in the scan results.
4. Flashing OpenWrt
Launch the OnHub Recovery Utility: Open the OnHub Recovery Utility extension you installed earlier, and select “Use Local Image” from the top-right menu. This time, choose the OpenWrt image you downloaded previously.
- Select the USB Flash Drive: From the menu, select the USB flash drive to create the OpenWrt recovery image.
- Opening the device case back door:
- Remove the Screw: Take out the single screw located at the bottom of the device.
- Pry Open the Cover: Using a flat screwdriver or guitar pick, gently insert it into the gap between the edge and the base cover, and carefully ease off the cover.
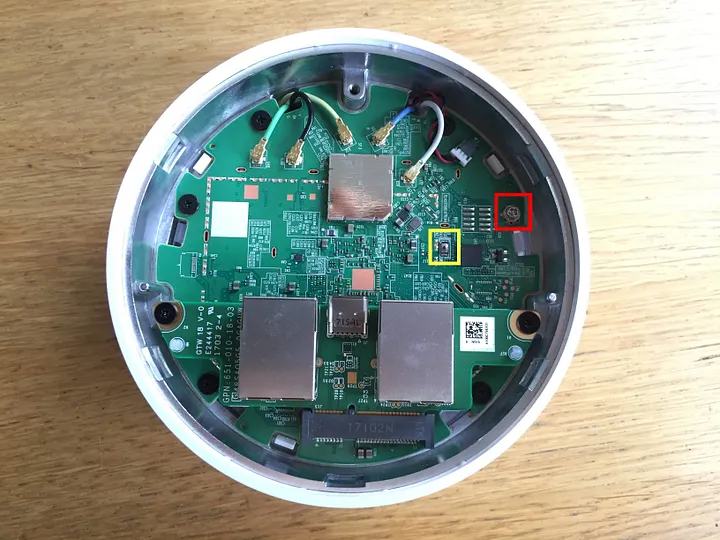
Inside the device, you’ll find the following components:
- Yellow: SW7, Developer Mode switch
- Red: Write-Protect screw
- White Button (on the side of the case, not pictured): Reset button
The image below shows the opened router case and its interior.
5. Booting device with OpenWrt
- Attach Power to the USB Hub: Connect the power to the USB hub, but do not connect the hub to the device yet. Also, insert the USB storage containing the OpenWrt image into the USB hub.
- Press and Hold the Reset Button: Press and hold the reset button on the device, then connect the USB hub’s power cable to the device.
- LED Status Indicators: The LED will go through various stages. Initially, it will be solid white, then flashing blue. After approximately 16 seconds, the LED should blink orange. At this point, release the reset button.
- LED Pulsing Orange and Amber: After about 3 seconds, the LED should pulse orange and amber.
- Press the SW7 Button: Use a screwdriver to press the SW7 button (the yellow point highlighted in the image above).
- Device Reboot: The device will blink purple once or twice and then restart. Wait a few seconds for it to finish booting (it will pulse blue). The LED will start blinking purple again.
- Press SW7 Again: Press the SW7 button once more. The LED should turn off, and the device should begin booting from the USB image. If this step fails, flashing the Google recovery image and starting over may help.
- Final Boot and Ethernet Connection: The device will restart and boot from the USB image, with the LED blinking blue. After about 30 seconds, connect the cable to the LAN/Ethernet port with the Earth icon on the case door (not any other Ethernet port!).
6. Program OpenWrt image to the eMMC storage:
- Connect the Ethernet Cable: Connect the Ethernet port on the device to your computer.
- Access the Device Web Interface: In your web browser, enter
192.168.1.1in the URL bar and hit Enter (no password is required). - Note: Ensure that any Wi-Fi interfaces on the computer are turned off to avoid connection issues.
- Copy the OpenWrt Firmware: Open a terminal on your computer and copy the OpenWrt firmware binary file to the device.
scp -O openwrt-23.05.5-ipq40xx-chromium-google_wifi-squashfs-factory.bin root@192.168.1.1:/tmp/- and write the firmware to eMMC storage
ssh root@192.168.1.1 -C "dd if=/dev/zero bs=512 seek=7634911 of=/dev/mmcblk0 count=33 && dd if=/tmp/openwrt-23.05.5-ipq40xx-chromium-google_wifi-squashfs-factory.bin of=/dev/mmcblk0"- Now remove the power cable and USB drive from device and close the device case back door. reboot the device.
- Plug the USB power adaptor directly to the device and wait until LED become solid blue. it’s ready now, enjoy it!
7. OpenWrt initial Configuration
- Connect the Ethernet Cable: Plug the Ethernet cable into the Ethernet port marked with the Earth icon on the device’s back door, and connect the other end to your computer’s Ethernet port. Ensure that any Wi-Fi interfaces on the computer are turned off.
- Access the Web Interface: In your browser, enter
192.168.1.1in the URL bar and hit Enter (no password is required). - Set a Strong Password: Set a strong password for the OpenWrt router.
- Configure Wireless Settings: You can now set the wireless interface name and password, and enable it.
- Change LAN Interface Settings: It’s recommended to edit the LAN interface and change the IPv4 address from
192.168.1.1to another unused address, such as192.168.1.120, to avoid conflicts with the gateway. - Update Gateway and DNS: Update the gateway IPv4 address to your gateway address (e.g.,
192.168.1.1) and add custom DNS servers (such as1.1.1.1and8.8.8.8). - Reconnect the Device: Unplug the power cable, then connect the device directly to your gateway router/modem using an Ethernet/LAN port.
- Login to Luci: Access the Luci web interface via the IP address you set (e.g.,
192.168.1.120) in your browser. - Set Timezone and Sync: Set the correct timezone, date, and time, and sync it accordingly.
8. Expanding the root filesystem partition:
You can expand your storage to the full 4GB this device has by executing the following through SSH. first we need to update the repositories and installing some packages:
- update the repositories:
opkg update- install below packages for expanding the device internal storage:
opkg install cfdisk resize2fs fdisk- run below command to expand the internal storage:
cfdisk /dev/mmcblk0- now select the /dev/mmcblk0p2 partition from the menu and select the resize. It should automatically select enough space to take up the rest of the empty space.
- select Write to write the partition table, type “yes” to confirm and the exit.
- Reboot the device again and update the filesystem with below command:
resize2fs /dev/loop0installing OpenVPN on OpenWrt:
opkg install openvpn-openssl luci-app-openvpn you can check openvpn logs by:
logread -f | grep openvpninstalling SSHTunnel on OpenWrt:
opkg install openssh-keygen sshtunnel luci-app-sshtunnel- generate a new ssh key:
ssh-keygen -b 2048 -t rsa- Copy the SSH key to the SSH server’s authorized keys file.
- To configure the SSH tunnel, you can either use the Luci app or edit the configuration file below via the command line:
vi /etc/config/sshtunnel- Uncomment the following items and set their respective values:
config server disney
 option user root
 option hostname SSH_SERVER_IP
 option port 22
 option retrydelay 5
 option IdentityFile /root/.ssh/id_rsa
 option LogLevel DEBUG
 option ServerAliveCountMax 30
 option ServerAliveInterval 30

config tunnelD proxy
 option server disney
 option localaddress *
option localport 9090- Enable sshtunnel and start the service:
/etc/init.d/sshtunnel enable
/etc/init.d/sshtunnel start- Set up the SOCKS proxy on the client side (e.g., Chrome or Firefox) by configuring the host to the OpenWrt IP address and the port number you set for the tunnelD localport as the SOCKS proxy.
You can use Passwall2 to route all traffic through the router, eliminating the need for configuration on the client side.
installing and configuring Passwall2 on OpenWrt:
opkg update- removing dnsmasq and installing dnsmasq-full:
opkg remove dnsmasq && opkg install dnsmasq-full- installing dependencies:
opkg install kmod-nft-tproxy kmod-nft-socket wget-ssl- get and add repo key:
wget -O passwall.pub https://master.dl.sourceforge.net/project/openwrt-passwall-build/passwall.pub && opkg-key add passwall.pub- add the repo:
read release arch << EOF $(. /etc/openwrt_release ; echo ${DISTRIB_RELEASE%.*} $DISTRIB_ARCH) EOF for feed in passwall_luci passwall_packages passwall2; do echo "src/gz $feed https://master.dl.sourceforge.net/project/openwrt-passwall-build/releases/packages-$release/$arch/$feed" >> /etc/opkg/customfeeds.conf done- update repo and install main packages:
opkg update && opkg install luci-app-passwall2 v2ray-geosite-ir- installing some extra packages:
opkg install v2ray-core xray-core ipset ipt2socks iptables iptables-legacy iptables-mod-conntrack-extra iptables-mod-iprange iptables-mod-socket iptables-mod-tproxy kmod-ipt-natNote: any issue to update from sourceforge repository you can manually download the packages from sourceforge and install it:
opkg install **package_name**Adding a new node to Passwall2:
type: xray
protocol: Socks
Address (Support Domain Name): 127.0.0.1
Port: 9090
Node Socks Listen Port: 1070
check “Main switch” and “Client Proxy”
save and apply, then click use to use added node.
installing Wireguard on OpenWrt:
- To install openVPN, below packages are required:
opkg install wireguard-tools kmod-wireguard luci-app-wireguard luci-i18n-wireguard-en luci-proto-wireguardRoute Iran Traffic Directly
1: Download GeoIP and Geosite Data
PassWall 2 relies on V2Ray-core data files to make routing decisions. First, SSH into your OpenWrt router and navigate to the V2Ray data directory and download the necessary files:
cd /usr/share/v2ray/
wget -O geoip.dat https://raw.githubusercontent.com/Chocolate4U/Iran-v2ray-rules/release/geoip.dat
wget -O geosite.dat https://raw.githubusercontent.com/Chocolate4U/Iran-v2ray-rules/release/geosite.dat
mv geoip.dat geoip_IR.dat
mv geosite.dat geosite_IR.dat
Tip: These files are regularly updated. Always ensure you download from trusted sources to maintain security.
2: Create a Shunt Rule
- Open your OpenWrt Web UI → PassWall 2 → Rule Management → Sing-Box/Xray Shunt Rule → Add Shunt Rule.
- Set the following:
- Remark:
Iran_whitelist - Domain rules:
regexp: .*\.ir$
regexp: .*\.xn--mgba3a4f16a$
ext: geosite_IR.dat:ir- IP rules:
ext: geoip_IR.dat:irSave and apply the rule.
3: Add a Shunt Node
Now, we need to configure a Shunt Node:
Navigate to PassWall 2 → Node List → Add Node.
Set the node configuration:
- Type: Xray
- Protocol: Shunt
- Rule:
Iran_whitelist→ Direct connection - Default: Any node you’ve previously configured for general proxy traffic
Save and apply.
4: Configure Basic Settings
Finally, set your main routing node:
- Go to PassWall 2 → Basic Settings.
- Set:
- Node:
xray_shunt(the Shunt Node you just created) - Default: Any other node for non-Iran traffic
Save and apply.
After completing these steps all Iran traffic (based on IP and domain rules) will connect directly. All other traffic will use your proxy nodes. This setup improves routing efficiency and ensures local traffic doesn’t go through unnecessary proxies.
Keep Data Files Updated
To keep routing rules accurate, regularly update geoip.dat and geosite.dat.
Conclusion:
The Google WiFi AC-1304 is an excellent choice for anyone looking to explore the capabilities of OpenWrt. Its strong hardware foundation ensures a smooth experience.
Have you tried using OpenWrt on your router? Share your experiences in the comments below!